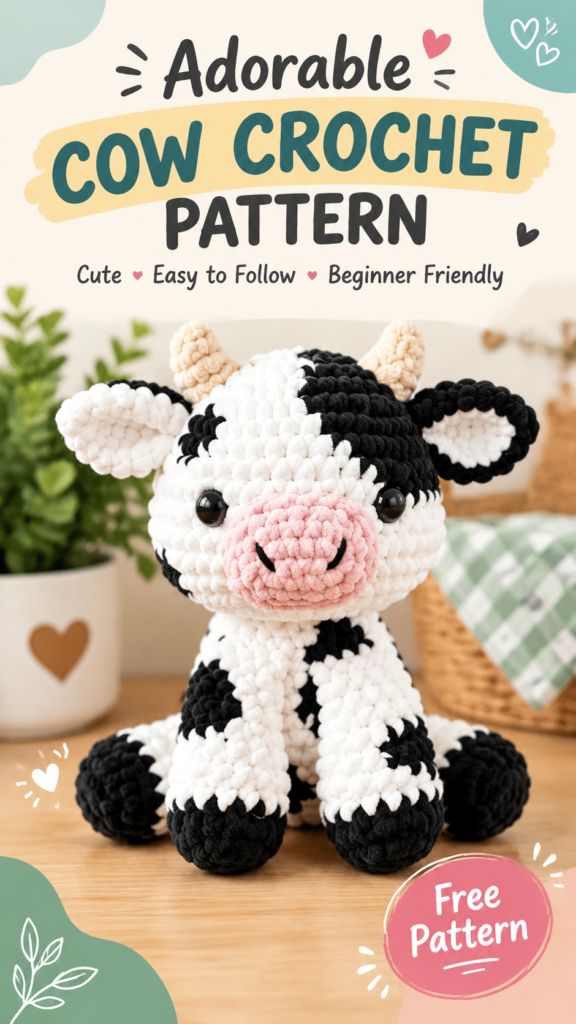
The crochet baby cow amigurumi is a charming handmade project designed to bring a playful farmyard friend to life with soft yarn, simple shaping, and adorable embroidered details. This cuddly cow-inspired crochet toy features a rounded head, tiny horns, floppy ears, a sweet muzzle, black and white color sections, and a compact plush body. It is an excellent choice for crocheters who enjoy creating amigurumi animals, nursery decorations, or thoughtful handmade crochet gift ideas.
This original interpretation uses classic amigurumi construction techniques with continuous rounds, single crochet stitches, strategic increases and decreases, and separate crocheted pieces joined together during finishing. The pattern below is inspired by the visible style of a small crochet cow plush and is written as a complete beginner-friendly design.
Key Takeaways
- Project type: Cute crochet baby cow amigurumi plush toy.
- Skill level: Confident beginner with basic shaping skills.
- Main technique: Continuous rounds using single crochet stitches.
- Suggested yarn: Soft worsted weight cotton or acrylic yarn.
- Features include separate ears, legs, horns, muzzle, and tail.
- Customization options allow different cow colors and sizes.
Description of This Crochet Baby Cow Amigurumi Project
This crochet baby cow amigurumi is designed as a small stuffed animal with a rounded silhouette and soft plush appearance. The finished toy has a large oval head, short body, tiny legs, wide ears, and a friendly embroidered face. The contrasting black and white patches create the recognizable cow appearance while the pink muzzle adds a gentle, playful touch.
The project belongs to the amigurumi category, where three-dimensional shapes are created by crocheting tightly worked stitches in the round and filling the pieces with stuffing. The construction method makes this type of crochet toy durable, lightweight, and suitable for decorating a child’s room or gifting to crochet lovers.
The suggested version is approximately 8 inches (20 cm) tall when finished. Because the exact materials used for a photographed crochet item cannot be determined visually, the recommendations below are designed to create a similar soft and rounded result.
Crochet Construction and Stitch Analysis
The cow is created using a traditional amigurumi method. The head, body, legs, ears, horns, muzzle, and tail are crocheted separately before assembly. Most sections are worked in continuous rounds, meaning you do not join each round with a slip stitch. A stitch marker is strongly recommended to keep track of the first stitch of every round.
The main texture comes from tightly packed single crochet stitches. This stitch creates a firm fabric that holds stuffing well and prevents large gaps between stitches. Small color changes create the cow’s spotted appearance, while embroidery adds facial expression without requiring complicated stitches.
Free Crochet Pattern: Baby Cow Amigurumi
Free Crochet Pattern
Pattern Name and Details
Project Name: Little Meadow Baby Cow Amigurumi
Description: A soft crochet cow plush featuring a rounded head, spotted body, tiny horns, floppy ears, and embroidered facial details.
Skill Level: Confident beginner
| Finished Size | Approx. 8 inches (20 cm) tall |
| Yarn | Suggested worsted weight yarn, approximately 180 yards (165 meters) total |
| Hook | Recommended 3.25 mm (US C-2) crochet hook |
| Gauge | Approx. 18 single crochet stitches x 20 rounds in 4 inches (10 cm) |
| Terminology | US crochet terms |
Materials
- White worsted weight yarn: approximately 120 yards (110 meters)
- Black worsted weight yarn: approximately 40 yards (37 meters)
- Pink worsted weight yarn: approximately 10 yards (9 meters)
- Small amount of beige or brown yarn for horns
- Polyester fiber stuffing
- Embroidery needle
- Black embroidery thread for facial details
- Stitch marker
- Scissors
Abbreviations
- MR: Magic ring
- sc: Single crochet
- inc: Increase, two single crochet stitches in one stitch
- dec: Invisible decrease
- sl st: Slip stitch
- ch: Chain
- st: Stitch
- FO: Fasten off
UK equivalent note: US single crochet is called double crochet in UK terminology.
Construction Notes
All body parts are worked in continuous rounds unless stated otherwise. Place a stitch marker in the first stitch of each round. Stuff pieces gradually while crocheting to maintain an even shape.
Head
- Round 1: Make MR, 6 sc. (6)
- Round 2: Inc around. (12)
- Round 3: (Sc 1, inc) repeat 6 times. (18)
- Round 4: (Sc 2, inc) repeat 6 times. (24)
- Round 5: (Sc 3, inc) repeat 6 times. (30)
- Round 6: (Sc 4, inc) repeat 6 times. (36)
- Rounds 7-13: Sc around. (36)
- Round 14: (Sc 4, dec) repeat 6 times. (30)
- Round 15: (Sc 3, dec) repeat 6 times. (24)
- Round 16: (Sc 2, dec) repeat 6 times. (18)
- Stuff firmly.
- Round 17: (Sc 1, dec) repeat 6 times. (12)
- Round 18: Dec around. (6)
- FO and close opening.
Body
- Round 1: MR, 6 sc. (6)
- Round 2: Inc around. (12)
- Round 3: (Sc 1, inc) repeat 6 times. (18)
- Round 4: (Sc 2, inc) repeat 6 times. (24)
- Rounds 5-10: Sc around. (24)
- Round 11: (Sc 2, dec) repeat 6 times. (18)
- Rounds 12-13: Sc around. (18)
- Round 14: (Sc 1, dec) repeat 6 times. (12)
- Stuff firmly.
- Round 15: Dec around. (6)
- FO and close.
Legs Make 4
- Round 1: With black yarn, MR, 6 sc. (6)
- Round 2: Inc around. (12)
- Rounds 3-5: Sc around. (12)
- Change to white yarn.
- Rounds 6-8: Sc around. (12)
- Lightly stuff.
- Round 9: (Sc 2, dec) repeat 3 times. (9)
- FO leaving a sewing tail.
Ears Make 2
- Round 1: MR, 6 sc. (6)
- Round 2: Inc around. (12)
- Round 3: Sc around. (12)
- Round 4: (Sc 2, dec) repeat 3 times. (9)
- Fold slightly flat and FO leaving a tail.
Horns Make 2
- Round 1: MR, 5 sc. (5)
- Rounds 2-4: Sc around. (5)
- FO and leave a sewing tail.
Muzzle
- Round 1: Using pink yarn, MR, 6 sc. (6)
- Round 2: Inc around. (12)
- Round 3: Sc around. (12)
- FO leaving a sewing tail.
Tail
- Chain 6.
- Slip stitch back along the chain.
- FO leaving a sewing tail.
Assembly Instructions
- Sew the head securely onto the top center of the body.
- Attach four legs evenly around the lower body.
- Sew ears to both sides of the head near the upper sides.
- Place horns above the ears.
- Attach the muzzle to the lower front of the face.
- Embroider eyes, nostrils, and small facial details.
- Add black patches using surface embroidery or small crocheted sections.
Safety Reminder: If this crochet baby cow is intended for babies or children under three, avoid plastic safety eyes and other small detachable pieces. Embroidered facial features are a safer option for young children.
Customization and Size Adjustment Ideas
This crochet baby cow pattern can easily be personalized by changing yarn colors, adding spots, or adjusting the proportions. To create a larger cow, use a thicker yarn and larger hook while keeping the same stitch sequence. To make a smaller version, use lightweight yarn and a smaller hook.
- Create a brown and white cow using earthy yarn shades.
- Add a tiny crocheted flower for a decorative accent.
- Make a matching farm animal collection with the same body shape.
- Use embroidered eyelashes or cheeks for different expressions.
Common Mistakes and Troubleshooting
Uneven Shapes
If the head or body looks lumpy, check that increases and decreases are placed correctly. Using a stitch marker helps maintain accurate round counts.
Loose Stitches
Large gaps between stitches can allow stuffing to show. Try a smaller hook or slightly tighter tension.
Assembly Problems
Pin all pieces in place before sewing. This allows you to adjust the placement and create a balanced expression.
Finishing, Care, and Maintenance
After assembly, gently shape the cow by adjusting the stuffing inside the head and body. Secure all yarn ends by weaving them through several stitches before trimming.
For cleaning, follow the care instructions of the chosen yarn. Most soft acrylic and cotton yarns can be gently hand washed and reshaped while damp. Allow the toy to dry completely before storing or gifting.
At a Glance
- Best yarn choice: Soft worsted weight cotton or acrylic yarn.
- Skill level: Beginner-friendly amigurumi with shaping techniques.
- Key technique: Continuous rounds with single crochet increases and decreases.
- Adjustment method: Change yarn weight and hook size for different dimensions.
- Finishing method: Secure stitching, stuffing, and embroidered details.
Create Your Own Crochet Baby Cow Amigurumi
A crochet baby cow amigurumi is a delightful way to practice shaping techniques while creating a handmade friend full of character. Choose soft yarn, check your tension, and read through the complete pattern before beginning. The beauty of amigurumi comes from personalization, so feel free to experiment with colors, expressions, and details to make your cow unique.
Whether you are creating a crochet gift idea, adding to a handmade animal collection, or learning your first stuffed toy techniques, this free crochet pattern provides a simple foundation for a lovable farm-inspired creation.
Tags
Crochet Baby Cow
Amigurumi Pattern
Free Crochet Pattern
Crochet Animal Toy
Beginner Crochet
Handmade Crochet