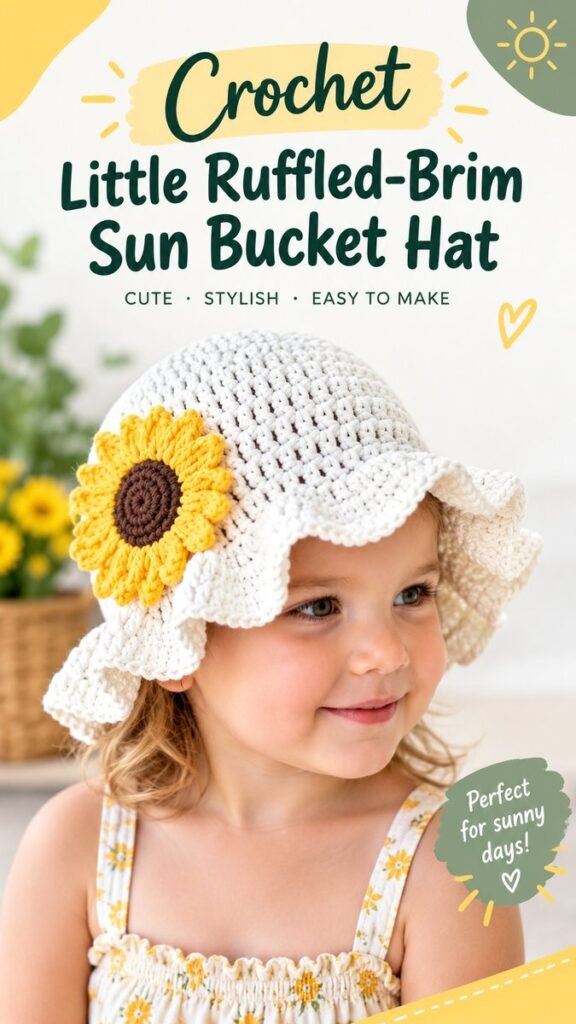
There is something especially charming about a handmade crochet baby bucket hat. This sweet ruffled-brim design combines a soft, rounded crown with a playful wavy edge and a cheerful sunflower embellishment, creating an accessory that feels both practical and adorable. A crochet baby bucket hat is also a wonderful project for using comfortable cotton yarn and experimenting with simple shaping, decorative edging, and easy floral details.
Key Takeaways
- Create a soft crochet baby bucket hat with a rounded crown and gently flared brim.
- Use breathable cotton yarn for a comfortable warm-weather accessory.
- Add a ruffled edge to give the hat a playful, feminine finish.
- Customize the look with a crochet sunflower or another small applique.
- Adjust the crown and brim gradually for a better fit.
- Use the project as a handmade baby shower or birthday gift idea.
Why a Crochet Baby Bucket Hat Is Such a Fun Project
Baby accessories are ideal crochet projects because small changes in color, texture, and edging can completely transform a simple shape. This particular crochet baby bucket hat has a classic silhouette, but the ruffled brim gives it an extra touch of personality. The sunflower decoration adds a bright seasonal accent against the neutral body of the hat.
The design can work beautifully with a summer wardrobe, especially when paired with lightweight dresses, cotton rompers, simple tops, or casual outfits. Because the overall shape is uncomplicated, it also provides plenty of room for customization.
Important: For a baby hat, comfort should come before decoration. Choose soft yarn, avoid scratchy fibers, and make sure every attached embellishment is firmly secured. Always supervise babies and young children when they are wearing handmade accessories.
Understanding the Design
The pictured style features a rounded crochet crown that sits comfortably over the head before transitioning into a wider brim. Instead of ending in a straight or rigid edge, the brim has a softly rippled appearance. This effect can be achieved through strategically increased stitches near the outer edge.
The hat body is worked in a light neutral shade, which makes the sunflower stand out. The flower uses a warm yellow petal color and a brown center, creating a simple contrast that immediately draws attention to the side of the hat.
Although the finished piece has a detailed appearance, the construction can be broken into manageable stages: crochet the crown, shape the sides, build the brim, create the ruffled edging, and finish with the decorative flower.
Materials You Can Use
- Soft, lightweight cotton or cotton-blend yarn in cream, white, or another neutral shade
- Small amounts of yellow yarn for the sunflower petals
- Small amount of brown yarn for the flower center
- A crochet hook appropriate for your yarn weight
- Yarn needle for weaving in ends
- Scissors
- Optional stitch marker
For a baby bucket hat, cotton is a practical choice because it is breathable and generally easy to wash. A smooth yarn also makes stitch definition easier to see while you work, which can be particularly helpful when shaping the crown and counting increases.
Choosing the Right Crochet Hook
The exact hook size depends on the yarn you choose and your personal tension. Rather than relying only on a recommended hook size printed on the yarn label, make a small sample first. The fabric should feel flexible without being so loose that large gaps appear between stitches.
A slightly firm fabric can help the hat maintain its shape, while an overly tight fabric may make the finished accessory uncomfortable. The goal is a lightweight fabric with enough structure to support the bucket-hat silhouette.
A Simple Crochet Baby Bucket Hat Pattern
The following pattern is an original project guide inspired by the visible style of the hat. It is intended as a flexible starting point rather than a claim to reproduce an original designer’s exact pattern. Measure the recipient’s head and adjust the number of rounds when necessary.
Abbreviations
- ch = chain
- sl st = slip stitch
- sc = single crochet
- hdc = half double crochet
- dc = double crochet
- st = stitch
- inc = increase
- rep = repeat
Step 1: Crochet the Crown
Begin with the neutral yarn and create a magic ring. Work a small group of single crochet stitches into the ring, then close the round with a slip stitch. If you prefer not to use a magic ring, you can chain a few stitches and join them into a ring instead.
- Work the first round evenly into the center ring.
- Increase evenly around the next round.
- Continue adding increases at regular intervals so the piece expands into a flat circle.
- Keep checking the shape after every round.
The crown should remain relatively flat while you are increasing. If the circle begins to curl upward too soon, you may need additional increases. If it develops noticeable waves before the brim stage, there may be too many increases.
Step 2: Build the Rounded Sides
Once the crown reaches an appropriate width, reduce the frequency of increases or stop increasing altogether. Work several rounds evenly to create the sides of the bucket hat.
For a baby-sized hat, the depth should be checked against the intended wearer rather than determined entirely by a fixed number of rounds. Place the unfinished hat gently against the head and check that it covers the upper portion comfortably without extending too far downward.
Pro Tip: Measure the head circumference before beginning and use the finished crochet fabric itself as your guide. Crochet tension varies significantly from person to person, so measuring as you work is more reliable than blindly following a fixed stitch count.
Step 3: Shape the Brim
The brim is where the bucket-hat character really begins to appear. Start introducing controlled increases around the lower edge of the hat. Work them evenly rather than placing all the increases in one area.
Begin with a modest amount of increase and check the shape. The brim should extend outward from the crown without becoming excessively floppy. Continue for several rounds until you reach the desired width.
For a more structured brim, keep your tension consistent and consider using a slightly smaller hook for the final round. For a softer summer look, maintain the same hook and yarn throughout.
Step 4: Create the Ruffled Edge
The decorative ruffle can be created by working multiple stitches into selected stitches around the outer edge. For example, groups of double crochet stitches can be placed at regular intervals to create gentle waves.
- Join the yarn at the outer edge of the brim.
- Work a base round around the circumference.
- Place several taller stitches into designated stitches to encourage the edge to flare.
- Repeat the decorative groups around the entire brim.
- Finish with a slip stitch and weave in the yarn tail.
The more stitches placed into each increase point, the fuller the ruffle will become. Keep the increases consistent so the finished edge looks balanced.
Expert Insight
A ruffled brim is essentially a controlled increase. If you want subtle waves, use fewer stitches in each increase group. For a more dramatic frill, increase the number of stitches or add another decorative round. This makes the same basic crochet baby bucket hat easy to personalize.
How to Make the Crochet Sunflower
The sunflower is a standout detail in this design. It transforms a simple neutral hat into a cheerful statement accessory without requiring complicated construction.
Create the Brown Center
Using brown yarn, form a small crochet circle using single crochet stitches. Increase evenly for a few rounds until the center reaches the desired size. Finish neatly and leave a yarn tail long enough to attach the flower securely to the hat.
Add the Yellow Petals
Switch to yellow yarn and work around the outside of the brown center. Each petal can be made from a small group of stitches worked into the same base stitch, followed by a slip stitch into the next stitch. Repeat around the circle.
For fuller petals, use taller stitches or slightly larger stitch groups. For a flatter flower, use shorter stitches. The goal is to create a cheerful flower that remains comfortable and relatively lightweight on the hat.
Attach the Flower Securely
Position the sunflower on the side of the hat and use the yarn needle to sew it firmly to the crochet fabric. Stitch through several areas of the flower rather than relying on one central attachment point.
Because this accessory is intended for a young child, inspect the flower carefully after attaching it. Loose yarn ends and poorly secured decorative pieces should be corrected before the hat is worn.
Choosing Colors for Your Baby Bucket Hat
The neutral body shown in the design is especially versatile because it allows the decorative flower to become the focal point. Cream, ivory, soft beige, pale pink, dusty blue, sage, and light yellow can all create a gentle baby-friendly palette.
For a more traditional sunflower look, pair golden yellow petals with a deep brown center. If you want something more modern, try a muted mustard flower with a chocolate center. You can also skip the sunflower and add a small crochet bow, simple flower, heart, or textured applique.
When selecting yarn colors, consider how they will look together under natural light. A simple two- or three-color palette often creates a cleaner finished result than using many contrasting shades.
Sizing and Fit Tips
A comfortable fit is one of the most important parts of making a crochet baby bucket hat. The hat should sit securely without pressing tightly against the head. Since babies grow quickly, it can be tempting to make the hat noticeably larger, but excessive looseness may cause it to slip over the eyes or move out of position.
- Measure around the widest part of the head before crocheting.
- Use your gauge to estimate how many stitches are needed for the circumference.
- Measure crown width before moving on to the sides.
- Check the hat depth as you work instead of waiting until the end.
- Keep the brim wide enough to provide the intended bucket-hat appearance without becoming cumbersome.
The easiest way to resize the project is usually to adjust the number of crown increase rounds. Once the desired crown diameter is reached, work the sides to the appropriate depth and then begin the brim.
Ways to Customize the Pattern
This project is a great base for experimenting. A few small changes can create an entirely different accessory while preserving the same basic construction.
Try a Different Brim
Instead of a strongly ruffled edge, finish the brim with a simple single crochet border for a cleaner appearance. You can also add a contrasting round around the edge for a subtle color-blocked effect.
Change the Applique
A sunflower works beautifully for spring and summer, but other small motifs can make the hat suitable for different seasons. Consider a simple daisy, strawberry, leaf, bow, or cluster of tiny flowers.
Experiment With Texture
For a more textured crochet baby hat, alternate simple stitches between rounds. Keep the crown relatively smooth if you want the brim and embellishment to remain the visual focus.
Care Tips for a Handmade Baby Hat
Always check the care instructions for your chosen yarn. Cotton crochet accessories can often be washed gently, but the exact method depends on the fiber blend and yarn manufacturer.
When the hat includes a decorative flower, hand washing or a gentle wash cycle may help preserve the shape. Reshape the hat while damp and allow it to dry naturally rather than exposing it to high heat.
Before every use, inspect the hat for loose threads, stretched stitches, or detached decorative elements. Handmade baby accessories benefit from regular checks because small repairs are much easier to complete before a problem becomes larger.
Perfect Occasions for a Crochet Baby Bucket Hat
A handmade crochet baby bucket hat makes a thoughtful project for many occasions. It can be created as a baby shower gift, first birthday accessory, summer photo-session piece, or simply a special handmade addition to a little one’s wardrobe.
The floral decoration makes this style particularly appealing for warm-weather outings and garden-inspired outfits. Pairing a neutral hat with a small colorful applique also makes it easy to coordinate with different clothing styles.
For a handmade gift set, consider pairing the hat with a matching crochet headband, baby blanket, booties, or small accessory in the same color palette.
Quick Points
- Use soft, breathable yarn for a comfortable baby accessory.
- Measure frequently to achieve a better fit.
- Increase gradually to shape the bucket-hat brim.
- Add a ruffled edge for a playful finish.
- Secure every decorative element firmly before use.
Conclusion
This crochet baby bucket hat free pattern idea is a lovely way to turn a simple crochet shape into a charming handmade accessory. The rounded crown keeps the construction approachable, while the flared ruffled brim and sunflower applique add the personality that makes the finished design special.
Whether you are making one for a little one’s summer wardrobe, preparing a handmade baby shower gift, or simply looking for a fun crochet project, this design offers plenty of opportunities to customize the size, colors, edging, and embellishment. Start with a comfortable yarn, measure as you work, and let the decorative details reflect your own style.
Final tip: Keep the construction simple and focus on fit, comfort, and secure finishing. A well-shaped crochet baby bucket hat does not need complicated stitches to look beautiful. Thoughtful color choices and one carefully made embellishment can make the entire project feel special.
Tags
Crochet Baby Hat Baby Bucket Hat Free Crochet Pattern Crochet Baby Patterns Crochet Summer Hat Baby Crochet Ideas Crochet Flower Hat Handmade Baby Gift