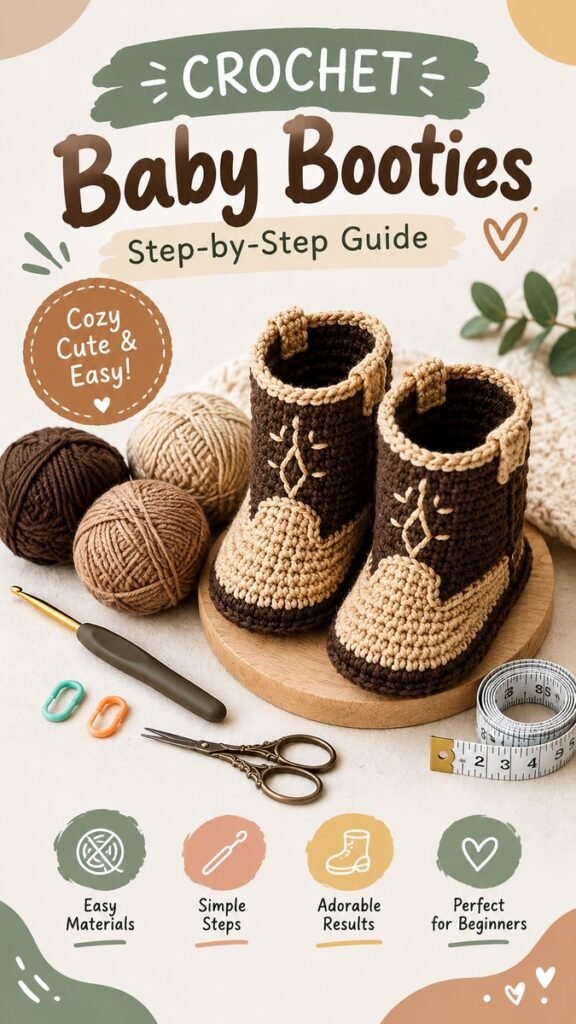
These crochet baby cowboy boots bring together two irresistible ideas: cozy handmade baby footwear and playful western style. With their rich brown and warm cream color combination, tall boot shape, contrasting toe, stitched detailing, and tiny pull tabs, they have the look of miniature cowboy boots while keeping the soft, handcrafted character of crochet. They make a charming project for a baby shower gift, newborn photo session, western-themed outfit, or anyone who loves making unique crochet accessories for little ones.
Key Takeaways
- Use brown and cream yarn to create a classic western-inspired look.
- A sturdy crochet sole provides structure while keeping the booties soft.
- Simple color changes can create the contrasting toe and decorative details.
- The pattern below is an original inspired design rather than a reproduction of a specific photographed pattern.
- Adjust the sole length and yarn tension to create a better fit for the intended baby.
Why Crochet Baby Cowboy Boots Are So Special
Baby booties are already one of the most satisfying small crochet projects, but adding cowboy boot details makes them even more memorable. The pictured design uses a dark chocolate brown body with a lighter tan toe, trim, and decorative accents. That contrast gives the boots plenty of visual definition without requiring complicated colorwork.
The tall shaft creates the recognizable silhouette of a western boot, while the rounded crocheted toe keeps the overall design soft and suitable for a baby accessory. Small details such as the contrasting stitching and pull tabs add personality without overwhelming the project.
Important: For baby footwear, fit and comfort should come before appearance. Keep the inside smooth, avoid loose decorative pieces, and make sure all ends are securely woven in. These booties are intended as a soft accessory and should not be treated as walking shoes.
Materials for Crochet Baby Cowboy Boots
The reference design clearly uses two coordinated yarn colors, a crochet hook, stitch markers, scissors, a yarn needle, and a measuring tape. A worsted-weight cotton yarn is shown, but the exact yarn specifications of the pictured project cannot be determined solely from the photograph. The following materials are therefore suggested starting points for an original version of the design.
- Dark brown worsted-weight yarn: approximately 70 to 100 yards for the main boot.
- Tan or oatmeal worsted-weight yarn: approximately 40 to 60 yards for toes, trim, and details.
- 4.0 mm crochet hook: a useful starting size for worsted-weight cotton.
- Stitch markers: especially helpful when working the sole and shaping the shaft.
- Yarn needle: for sewing pieces together and weaving in ends.
- Small scissors: for clean yarn finishing.
- Measuring tape: to check the sole length and circumference.
If your yarn produces a fabric that feels too stiff, try a slightly larger hook. If it looks loose and floppy, move down a hook size. Baby booties benefit from fabric that holds its shape without becoming rigid.
Choosing Yarn and Colors
The warm brown and tan palette shown in the design works particularly well because it immediately suggests leather cowboy boots while remaining soft enough for baby accessories. Chocolate brown creates the visual base, while oatmeal, camel, or light beige makes the toe and decorative stitching stand out.
For a softer nursery aesthetic, replace dark brown with warm taupe and use ivory for the contrast. For a classic western palette, try espresso with sand or caramel with cream. You can also introduce a muted rust, dusty blue, sage green, or mustard accent if you want a more playful handmade look.
Cotton is a practical starting point because it produces defined stitches and a relatively stable fabric. A soft acrylic or cotton blend can also work, provided the finished fabric is comfortable and appropriate for the intended use.
Crochet Baby Cowboy Boots Pattern
This original pattern is designed to capture the main visual characteristics of the pictured boots: a rounded sole, contrasting toe, tall brown shaft, lighter edging, pull tabs, and simple western-inspired stitching. It is written using standard US crochet terminology.
Skill Level
Advanced beginner to intermediate. The basic construction uses single crochet, half double crochet, increases, decreases, slip stitches, and simple surface embroidery. The most important skills are maintaining even tension and shaping the toe and shaft neatly.
Abbreviations
- ch: chain
- sl st: slip stitch
- sc: single crochet
- hdc: half double crochet
- sc2tog: single crochet two stitches together
- st: stitch
- inc: increase
- BLO: back loop only
- FO: fasten off
Suggested Finished Size
The instructions below are a starting point for a small baby bootie. Because baby feet vary considerably, use the baby’s foot measurement whenever possible rather than relying solely on age ranges. Aim for a sole that is slightly longer than the foot while leaving enough room for comfortable movement.
Gauge
With worsted-weight yarn and a 4.0 mm hook, work approximately 15 to 17 single crochet stitches across 4 inches. Row height can vary according to tension, so the finished sole measurement is more useful than gauge alone for this project.
Step 1: Crochet the Sole
Begin with the tan yarn. The sole is worked in rounds around a foundation chain so the finished shape has a rounded toe and heel.
- Ch 11.
- Sc in the 2nd ch from hook and in the next 8 chains.
- Work 3 sc in the final chain to turn around the end.
- Continue along the opposite side of the foundation chain with 8 sc.
- Work 2 sc in the remaining end stitch and join with a sl st.
- Ch 1 and continue around, placing increases around the rounded ends.
- Work another round of sc, adding increases only where needed to maintain a smooth oval.
Before continuing, measure the sole against the intended foot. If it is too short, add another round using evenly spaced increases. If it is too long, remove a round or reduce the starting chain length.
Creating a Defined Sole Edge
Once the sole reaches the desired length, work one round of single crochet through the back loops only. This creates a subtle ridge around the perimeter. The ridge helps visually separate the sole from the upper portion and gives the boot a more structured appearance.
Step 2: Shape the Contrasting Toe
Switch to the tan yarn if your sole was started in another color. The toe should cover roughly the front third of the bootie. Rather than making a separate piece, the toe can be shaped directly into the upper for a clean finish.
Mark the center front of the sole. Work sc stitches across the front section, using gentle decreases near the sides to create a rounded, slightly raised toe. Continue for several rows, decreasing gradually until the toe transitions smoothly into the main upper.
The goal is not to create a sharply pointed cowboy boot. For a baby bootie, a rounded toe is more comfortable and visually appropriate. The western character comes from the color blocking and decorative details rather than an exaggerated shape.
Step 3: Build the Brown Boot Shaft
Attach the dark brown yarn near the back of the toe. Work single crochet evenly around the upper, keeping the stitches firm but not tight. Continue in rounds until the boot reaches the desired height.
For a design similar to the reference, create a shaft that is noticeably taller than a traditional low baby bootie. The extra height gives the finished piece its unmistakable cowboy boot silhouette.
Keep the sides as straight as possible. Unlike the sole, the shaft generally does not need frequent increases. If your stitches begin pulling inward, add an occasional increase. If the shaft flares outward too much, check your tension before removing stitches.
Expert Insight
The visual impact of these booties comes from contrast. You do not need complicated stitches to make them look detailed. A clean single crochet fabric paired with a lighter toe, trim, and a few embroidered lines can create a polished western-inspired finish.
Step 4: Add the Cowboy Boot Top
When the shaft reaches the preferred height, finish with a contrasting tan edging. A simple round of single crochet creates a clean border. For a more pronounced rope-like edge, work a round of reverse single crochet or use a neat slip-stitch edging.
The reference design also features small contrasting tabs at the sides of the boot opening. These can be crocheted as short strips and attached securely.
Simple Pull Tabs
- With tan yarn, ch 7.
- Sc across the chain for 6 stitches.
- Work 2 to 3 additional rows of sc.
- Fold the small strip into a loop.
- Secure each end near the inside edge of the boot opening.
Make sure the tabs are firmly attached and do not create a loose loop that could catch on objects. They are primarily decorative on a baby accessory.
Step 5: Add Western-Inspired Decorative Stitching
One of the most charming details in the design is the lighter stitching running down the front of the brown shaft. You can recreate the look with surface crochet or simple embroidery using tan yarn.
Thread the yarn onto a blunt yarn needle and create a narrow vertical decorative line. Add short diagonal stitches crossing the line to form a simple geometric western-inspired motif. Keep both boots as symmetrical as possible, but do not worry if the handmade details have slight differences.
For additional decoration, outline part of the toe or add a small border near the ankle. The key is restraint. A few carefully placed lines can look much more polished than covering the entire boot with decoration.
Step 6: Finish and Shape the Booties
Fasten off all yarn securely and weave the ends into the inside of the boot. Trim excess yarn only after the ends are firmly secured. Gently shape the toe and shaft with your fingers.
Place both booties side by side and compare their sole lengths, shaft heights, toe shapes, and decorative placement. Small differences are normal in handmade crochet, but checking them together helps create a more coordinated pair.
Pro Tip: Measure before you decorate. If the bootie needs adjustment, it is much easier to correct the construction before adding surface stitching, edging, and other finishing details.
How to Customize the Crochet Baby Cowboy Boots
Once you understand the basic construction, there are many ways to make the design your own. The easiest customization is color. Keep the same two-color structure but experiment with different combinations to match a baby’s outfit or nursery theme.
- Classic western: chocolate brown, tan, and cream.
- Rustic neutral: taupe, oatmeal, and ivory.
- Desert-inspired: warm rust, sand, and beige.
- Soft nursery: cocoa, cream, and muted sage.
- Playful western: brown, denim blue, and warm cream.
You can also modify the shaft height. A shorter shaft creates a casual ankle bootie, while a taller shaft gives a more traditional cowboy boot appearance. Another option is to add a contrasting band around the upper edge.
Tips for Getting a Better Fit
Baby crochet projects can be deceptively tricky because a difference of even a few stitches can noticeably change the finished size. Whenever possible, measure the baby’s foot and compare it with your sole as you work.
- Measure the foot from heel to longest toe.
- Allow a small amount of extra room for comfort.
- Check the width across the widest part of the sole.
- Keep both booties consistent by counting rounds rather than relying only on appearance.
- Choose soft yarn with a comfortable hand and avoid scratchy fibers.
- Keep seams and yarn ends away from areas that could rub against the baby’s skin.
Because crochet fabric stretches, the finished measurement can change slightly when worn. A bootie should feel secure without being tight around the foot or ankle.
Baby Safety and Finishing Considerations
Decorative crochet baby items require extra attention to finishing. Avoid small buttons, beads, charms, or other detachable embellishments on items intended for babies. Instead, use securely embroidered details or crocheted color changes.
Inspect every seam before use. Pull gently on the pull tabs, decorative stitching, sole, and upper to make sure everything is firmly attached. Weave in yarn ends thoroughly and trim them neatly.
These booties are best considered a decorative or soft accessory rather than footwear for walking. They do not provide the grip, support, or construction of a purpose-made baby shoe.
Care for Handmade Crochet Booties
Care instructions depend on the yarn used, so always check the yarn manufacturer’s label. In general, gentle washing and careful reshaping help preserve the structure of handmade crochet.
After washing, reshape the booties with your fingers and allow them to dry naturally. Avoid excessive heat, which can change the dimensions or texture of some fibers. Store the finished pair in a clean, dry place away from moisture.
Why This Project Makes a Lovely Handmade Gift
Small crochet projects are especially satisfying to give because they can be personalized without requiring a huge time commitment. These baby cowboy boots have a distinctive theme that makes them ideal for western-inspired baby showers, ranch families, milestone photographs, or handmade gift baskets.
You could pair the booties with a crocheted baby blanket, a simple hat, or a matching accessory in the same brown and cream palette. For a coordinated gift, use the same yarn colors throughout each item.
The finished booties also photograph beautifully. Place them beside a soft blanket, neutral baby clothing, wooden props, or other natural textures to emphasize their handmade character.
Quick Points
- Brown and tan yarn create an instantly recognizable western look.
- Start with the sole and check measurements before building the shaft.
- Use surface embroidery for simple decorative cowboy details.
- Keep baby safety and secure finishing ahead of decorative extras.
- Customize colors and shaft height to create your own unique pair.
Conclusion
These crochet baby cowboy boots are a fun example of how thoughtful color choices and a few well-placed details can transform a simple crochet construction into something full of personality. The warm brown body, contrasting tan toe, tall shaft, decorative stitching, and small pull tabs work together to create an adorable western-inspired design.
The original pattern approach above gives you a flexible foundation rather than locking you into one exact size or color combination. Adjust the sole to the baby’s measurements, experiment with your favorite yarn shades, and keep the decorative details simple and secure. Whether you are making them as a baby shower gift, a photo prop, or a special handmade accessory, these tiny cowboy boots are a memorable crochet project with plenty of room for creativity.