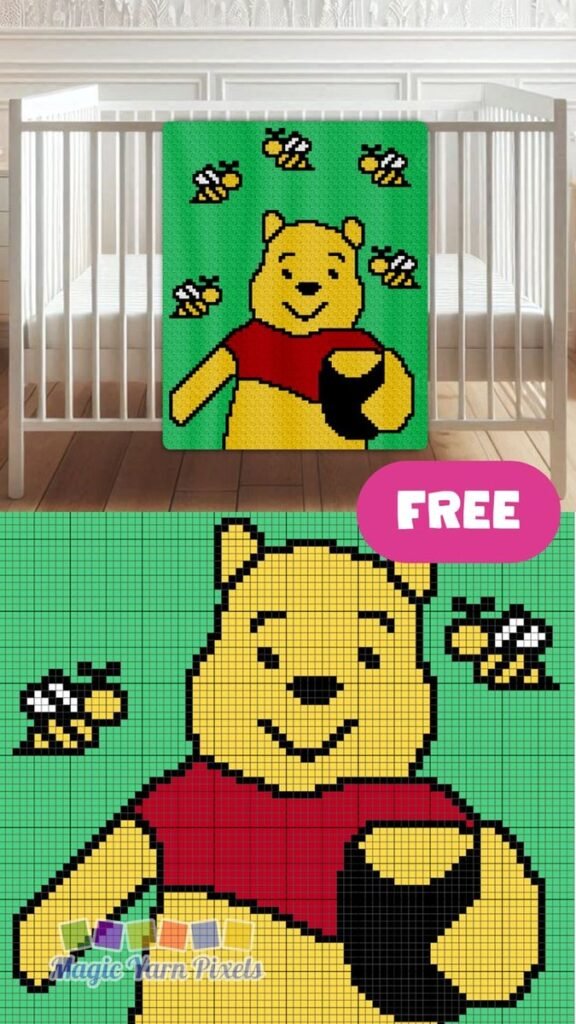
Bring a little nostalgic charm into a nursery or handmade gift collection with a Winnie the Pooh crochet blanket inspired by classic pixel-style crochet designs. The pictured project combines a cheerful Pooh-inspired character, buzzing bees, bold black outlines, and a bright green background to create a playful statement blanket. The grid-based artwork makes this style especially appealing to crocheters who enjoy graph patterns, colorwork, and character-inspired projects.
Key Takeaways
- A pixel-style baby blanket can turn a simple crochet project into a decorative nursery centerpiece.
- Bold color blocks make character-inspired graph blankets easier to plan and follow.
- A green background creates strong contrast with warm yellow, red, black, and white details.
- The design can be adapted for different blanket sizes, color palettes, and crochet skill levels.
- Careful yarn organization is especially helpful when working with multiple small color sections.
Why a Winnie the Pooh Crochet Blanket Makes a Charming Baby Project
Character-inspired crochet blankets have a special appeal because they combine practical warmth with decorative personality. A handmade baby blanket can become part of nursery decor while also serving as a thoughtful keepsake for a growing child. The design shown here has an especially cheerful quality because the central character is surrounded by small bees, creating a lively scene rather than a single isolated motif.
The combination of a recognizable character silhouette and a simple background also makes the design visually effective from a distance. Up close, the individual stitches and color changes create texture. From across the room, the larger shapes form a bold graphic image.
Important: When creating a character-inspired crochet blanket, think of the project as a decorative craft interpretation rather than an exact reproduction. A slightly different arrangement of colors, motifs, borders, or background elements can give your handmade piece its own personality.
Understanding the Pixel Crochet Style
The most noticeable feature of this blanket concept is its pixel-art appearance. The character is constructed from square-like blocks that resemble the individual cells of a crochet graph. Black outlines separate the major shapes, while yellow, red, white, and green sections define the recognizable visual elements.
This approach is particularly useful for crocheters because a picture can be translated into a grid. Each square represents a stitch or a small group of stitches, depending on the chosen technique and gauge. Instead of shaping every curve individually, the design is built from a series of planned color placements.
Why Graph-Style Designs Are Beginner Friendly
Graph crochet may look complicated at first, but the underlying concept is straightforward. You follow rows across a chart and change colors according to the symbols or colored squares. The key is maintaining consistent stitch counts and checking your work regularly.
For a first project, a smaller motif can be easier to manage than an enormous blanket. Once you become comfortable with reading rows, carrying yarn, changing colors, and keeping your edges straight, you can move toward a larger baby blanket design.
Choosing the Right Crochet Technique
Several crochet techniques can create a grid-based character blanket. Single crochet is one of the most accessible choices because its dense fabric works naturally with graph patterns. Corner-to-corner crochet can also create pixel-style artwork, especially when the design is built around diagonal blocks. Tapestry crochet offers another option for projects where multiple colors appear within the same row.
The best method depends on the level of detail you want, how frequently colors change, and the type of fabric you prefer. A dense stitch structure is often useful for baby blankets because it creates a stable surface that displays graphic motifs clearly.
Color Palette for a Pooh-Inspired Baby Blanket
The reference design uses a vivid combination of warm and contrasting colors. A golden yellow character stands prominently against a bright green background, while a red shirt creates another strong focal area. Black outlines add definition, and small white sections help distinguish the bee motifs.
You do not have to reproduce the exact shades to capture the same visual effect. In fact, selecting your own palette can make the blanket feel more personal and better suited to a particular nursery.
- Golden yellow: Useful for the main character and warm focal details.
- Red: Creates a strong accent and helps the character stand out.
- Black: Defines outlines and separates adjacent color blocks.
- White or cream: Adds highlights and lighter details.
- Green: Provides a lively background and strong contrast.
For a softer nursery aesthetic, consider replacing bright green with sage, mint, or muted eucalyptus. Cream can replace stark white, while mustard can provide a warmer alternative to bright yellow. The important point is maintaining enough contrast between the character and the background.
Expert Insight
For pixel-style crochet, contrast is often more important than using the exact original shades. Before committing to a large blanket, place small yarn samples beside one another and check whether the outlines remain clearly visible against the surrounding colors.
Planning Your Crochet Baby Blanket
Before beginning, decide how large you want the finished blanket to be. A small stroller or lovey-sized version requires fewer stitches and less yarn, while a larger crib or toddler blanket provides more space for a detailed character scene.
Sketching the project as a grid before crocheting can save considerable time. Start with the central character, then decide where the surrounding bees or other decorative motifs will sit. Leave enough negative space around major elements so the design does not become visually crowded.
Create a Simple Graph First
- Choose the approximate finished width and height.
- Select the stitch and yarn weight you plan to use.
- Make a gauge swatch to estimate how many stitches fit across your chosen measurement.
- Transfer the major character shapes onto a square grid.
- Add secondary motifs such as bees around the main image.
- Mark every color clearly before beginning the full blanket.
A graph does not have to be artistically complicated. Even a basic grid with colored squares can provide enough information to keep the rows organized. If you are working on a large design, number the rows and columns so you can quickly locate your position after taking a break.
Yarn and Hook Considerations
For a baby blanket, choose a soft yarn that is comfortable against delicate skin and appropriate for the intended care routine. Acrylic, cotton, and soft blended yarns are common choices for washable handmade blankets. Always check the yarn label for washing instructions and consider how the finished fabric feels after laundering.
The crochet hook size should match the yarn and the fabric you want to create. A tighter fabric can make pixel artwork appear crisp, while a looser fabric may produce a softer drape. The ideal balance is a blanket that is comfortable without becoming so loose that the graphic design loses definition.
Make a small swatch before starting. This allows you to check stitch appearance, color interaction, fabric density, and approximate sizing. It also gives you a chance to determine whether your chosen black outline is strong enough against the surrounding colors.
How to Organize Multiple Yarn Colors
Character blankets can involve several yarn colors in the same row. Without a little organization, the strands can quickly become tangled. Prepare separate yarn balls or bobbins for the colors that appear repeatedly and keep them positioned in the order they are needed.
When changing colors, work the final part of the previous stitch with the new color if your chosen technique calls for a clean color transition. Keep the tension consistent so the finished squares remain even.
For small isolated motifs, carrying every color across the entire row may create unnecessary bulk on the back. Depending on the design, you may prefer to introduce a separate strand for an individual section and secure the ends carefully later.
Pro Tip: Stop every few rows to inspect the overall picture rather than focusing only on individual stitches. Pixel designs can look correct one row at a time while a small missed color change becomes much easier to spot when you view the entire motif.
Adding the Bee Motifs
The small bee shapes around the central character are an important part of the design’s playful atmosphere. They also demonstrate how tiny repeating motifs can make a large blanket feel more complete.
When adding small bees, keep their shapes simple. A few blocks of yellow, black, and white can communicate the idea without requiring a highly detailed illustration. Repeating the motif at different positions can create movement and balance across the background.
Creating a Balanced Layout
Avoid placing every small motif at exactly the same distance from the center. Slight variations can make the composition feel more natural. At the same time, keep enough empty background around the main character so the central figure remains the dominant focal point.
You can also create a decorative border around the finished blanket. A simple single-color border keeps attention on the central graph, while a striped or multicolor border can make the piece feel more playful.
Ideas for Personalizing the Blanket
One of the joys of handmade crochet is the ability to adapt a basic concept. Instead of treating the pictured layout as a fixed pattern, use it as inspiration for your own nursery blanket.
- Change the background to a soft nursery shade.
- Add a contrasting border around the entire blanket.
- Arrange fewer or more bee motifs depending on the blanket size.
- Use a simpler central silhouette for a beginner-friendly project.
- Add a child’s initial in a small corner area.
- Experiment with pastel shades for a softer look.
- Create a coordinating pillow or baby lovey using one small motif.
If the blanket is intended as a gift, consider matching its colors with the nursery palette. A handmade piece can feel especially thoughtful when its colors complement existing blankets, curtains, storage baskets, or wall decor.
Common Crochet Mistakes to Avoid
Graph blankets reward patience. One of the most common problems is losing track of the row or accidentally skipping a stitch. Counting regularly is much easier than trying to repair several rows later.
Another issue is inconsistent tension. If some rows are noticeably tighter than others, the graph may appear distorted. Try to maintain a relaxed, repeatable grip on the yarn and hook.
Color management is another important consideration. If multiple strands are used at once, keep them separated and untangled. A small yarn bowl, clips, or individual yarn bags can make the process much more manageable.
Finally, remember that handmade crochet does not have to look machine-perfect. Small variations are part of the character of a handmade blanket. Focus on consistent structure, secure finishing, and an overall design that you enjoy.
Finishing and Caring for a Baby Crochet Blanket
Once the main blanket is complete, inspect the edges and weave in loose yarn ends securely. A neat border can help stabilize the shape and provide a polished finish.
Before gifting a baby blanket, follow the care instructions for the specific yarn used. If the yarn is machine washable, use the recommended cycle and drying method. Avoid assuming that every yarn behaves the same way after washing.
For a handmade baby gift, clear care instructions are a useful addition. A small note explaining the recommended washing method can help the recipient keep the blanket looking beautiful for years.
Why This Project Is Worth Saving
This type of Winnie the Pooh inspired crochet blanket brings together several popular craft ideas in one project: baby crochet, graph blankets, character-inspired designs, colorful crochet, and handmade nursery decor. The pixel-art structure also makes the concept easy to reinterpret using your own colors and layout.
Whether you are an experienced crocheter looking for a larger colorwork project or a beginner who wants to practice reading a simple graph, the design offers plenty of room for creativity. Starting with a small swatch or motif lets you test your technique before committing to the complete blanket.
At a Glance
- Style: Pixel-inspired character crochet
- Best for: Baby blankets, nursery decor, and handmade gifts
- Key colors: Yellow, red, green, black, and white or cream
- Skill focus: Color changes, graph reading, stitch counting, and finishing
- Design feature: Central character surrounded by small bee motifs
Conclusion
A Winnie the Pooh crochet blanket can be a wonderfully cheerful addition to a handmade baby collection. The combination of a bold pixel-style character, playful bees, and contrasting colors gives the project an unmistakable storybook-inspired feel while leaving plenty of room for personal creativity.
The most successful version does not have to reproduce every detail of the inspiration. Choose a comfortable yarn, build a clear graph, keep your color changes organized, and take time to check your stitch counts. From there, you can adjust the background, border, motif placement, and palette to create a blanket that feels uniquely handmade.
Whether you make a small baby blanket for a special gift or a larger nursery throw to become a treasured keepsake, this character-inspired crochet concept offers a fun way to combine practical crafting with nostalgic design. Save the idea, gather your yarn, and start planning your own colorful crochet blanket.