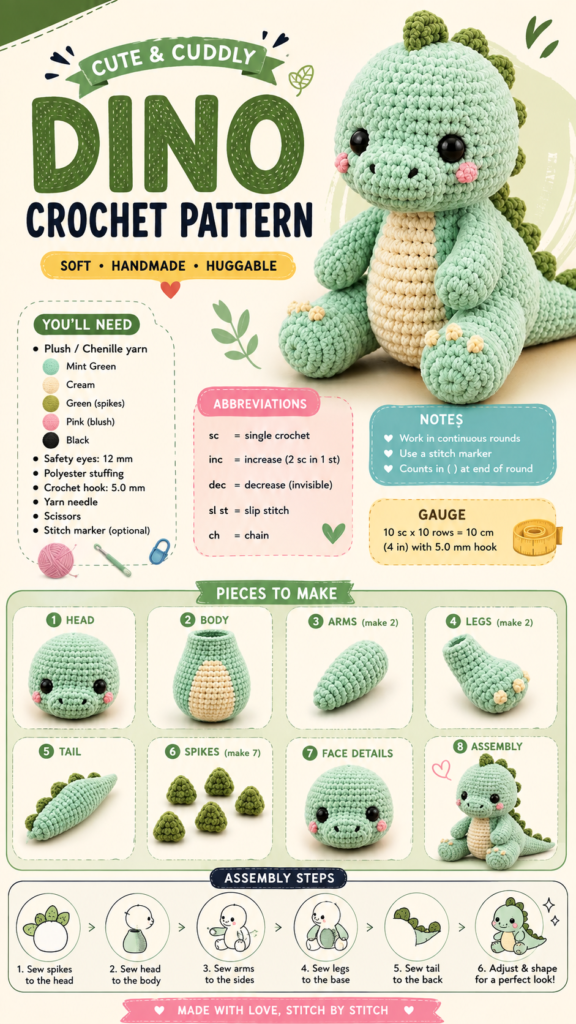
Cute amigurumi crochet projects have a special way of turning simple stitches and soft yarn into characters that feel full of personality. A mint-green crochet dinosaur is a perfect example, combining a rounded head, tiny arms, chunky feet, a textured tail, and playful spikes into one irresistibly cuddly design. Whether you are looking for a beginner-friendly crochet project, a handmade gift idea, or inspiration for your next amigurumi creation, this style of dinosaur offers plenty of creative possibilities.
The appeal of cute amigurumi is not only in the finished character. It is also in the process of building something piece by piece. The featured dinosaur design brings together several classic amigurumi techniques, including working in continuous rounds, increasing, decreasing, stuffing, sewing separate pieces together, and adding simple embroidered facial details. The result is a soft handmade toy with a friendly expression and a charming pastel color palette.
Key Takeaways
- A cute crochet dinosaur is a fun amigurumi project for practicing basic shaping techniques.
- Plush or chenille yarn creates the soft, rounded appearance associated with cuddly amigurumi.
- The design uses separate pieces for the head, body, arms, legs, tail, and spikes.
- Simple face details can transform basic crochet shapes into an expressive character.
- Pastel colors, contrasting accents, and small decorative flowers can personalize the finished project.
- Careful stuffing and balanced assembly help create a neat, stable finished toy.
Why Cute Amigurumi Projects Are So Appealing
Amigurumi is all about creating three-dimensional forms with crochet. Unlike flat crochet motifs, amigurumi pieces are usually worked in rounds and shaped gradually so they can be stuffed and assembled into animals, characters, plants, and decorative objects. This makes the craft especially satisfying because every round visibly contributes to the final form.
A cute dinosaur is particularly appealing because its shape allows for plenty of character. The large rounded head creates an instantly recognizable expression, while the short arms, oversized feet, long tail, and small back spikes give the design a playful silhouette. The combination of a soft green body and cream-colored belly adds even more visual interest without making the project look complicated.
Important: In amigurumi, small details often make the biggest difference. A carefully positioned pair of safety eyes, a simple embroidered mouth, and subtle blush can turn an ordinary crocheted shape into a character with a distinct personality.
Materials for a Soft Crochet Dinosaur
The visual design suggests a plush or chenille-style yarn, which is ideal when the goal is a soft, squishy finish. The main body uses a gentle mint-green shade, while cream creates the belly and smaller green pieces provide contrast for the spikes. Pink can be used for rosy cheeks, and black adds definition to the eyes and facial features.
- Plush or chenille yarn: Choose a soft yarn in mint green or a similar pastel shade for the main body.
- Cream yarn: Useful for creating the contrasting belly section.
- Green accent yarn: A slightly deeper shade works well for the dinosaur spikes.
- Pink yarn: Ideal for small blush details or decorative accents.
- Black details: Used for the eyes and tiny facial features.
- Safety eyes: The illustrated design uses medium-sized black safety eyes.
- Polyester stuffing: Provides volume and helps the head and body hold their rounded shapes.
- Crochet hook: A 5 mm hook is shown as part of the project materials.
- Yarn needle: Useful for sewing pieces together and weaving in ends.
- Scissors: Keep a sharp pair nearby for clean yarn finishing.
- Stitch marker: Helpful when working continuous crochet rounds.
Choosing the Right Yarn
Plush yarn is particularly effective for cute amigurumi because it gives simple crochet stitches a soft, velvety appearance. It also makes rounded shapes look fuller and more toy-like. However, plush yarn can sometimes make individual stitches harder to see, so beginners may find it easier to practice the shaping techniques with a smooth yarn before moving to chenille.
Color is another important consideration. A soft green creates the recognizable dinosaur theme, while cream provides a warm contrast. You can easily change the palette to create a blue, lavender, yellow, peach, or rainbow dinosaur without changing the basic construction.
Understanding the Main Crochet Pieces
One of the clearest features of this type of amigurumi project is its modular construction. Instead of crocheting the entire character as one complicated piece, the dinosaur is divided into manageable sections. This makes the project easier to organize and gives you opportunities to check the shape of each component before assembly.
1. The Head
The head is the visual focal point of the dinosaur. It is designed as a rounded form with a broad face and enough depth for safety eyes and embroidered features. Increasing stitches gradually creates the wider portions, while decreasing rounds help bring the shape back together.
Because the face determines much of the character’s expression, take time when positioning the eyes. Even a small change in their spacing or height can make the dinosaur look sleepy, surprised, cheerful, or curious.
2. The Body
The body is slightly narrower at the top and fuller toward the lower section. The cream belly provides contrast and visually separates the front from the green outer body. This creates a classic stuffed-animal appearance while keeping the construction relatively simple.
When stuffing the body, aim for an even distribution. Too little stuffing can make the body collapse, while excessive stuffing can stretch the stitches and distort the intended shape.
3. Arms and Legs
The short arms and larger feet contribute to the cute proportions of the dinosaur. These pieces are compact enough to crochet separately and then sew securely to the body. Small decorative flowers shown near the feet provide an optional playful touch and demonstrate how embellishments can personalize an amigurumi design.
4. The Tail
The tapered tail gives the dinosaur its recognizable silhouette. A gradual decrease creates the pointed end, while a broader base allows it to connect naturally to the back of the body. Proper positioning is important because the tail can also help visually balance the character when it is sitting.
5. The Spikes
Small textured spikes are attached along the head and back. Using a darker green shade makes them stand out against the mint body. They are one of the simplest ways to reinforce the dinosaur theme without adding complicated surface crochet.
Expert Insight
Treat each crocheted component as part of the character’s overall silhouette. Before permanently sewing the pieces in place, pin or loosely position the arms, legs, tail, and spikes. This simple step makes it much easier to create balanced proportions and a polished finished look.
Basic Amigurumi Techniques to Know
A project like this is an excellent way to practice several foundational amigurumi skills. The illustrated pattern references common crochet abbreviations such as single crochet, increase, decrease, slip stitch, and chain. Understanding these techniques makes many other amigurumi patterns easier to follow.
Working in Continuous Rounds
Many amigurumi shapes are worked in continuous rounds rather than joined rounds. This helps avoid a visible seam running around the piece. A stitch marker can be placed at the beginning of each round so you can keep track of where one round ends and the next begins.
Increasing and Decreasing
Increasing adds stitches and allows a piece to become wider. Decreasing removes stitches and gradually narrows the shape. Together, these techniques create the spherical head, rounded body, tapered tail, and other three-dimensional forms that define amigurumi.
Stuffing for an Even Shape
Stuff the piece gradually as you crochet rather than waiting until the opening is very small. This makes it easier to distribute the filling evenly and prevents obvious lumps. Add small amounts at a time and use your fingers or a blunt tool to gently push the stuffing into corners.
Pro Tip: For a smooth amigurumi finish, check the shape from several angles while stuffing. The goal is a firm but flexible form that holds its shape without making the crochet fabric look stretched.
Creating an Adorable Dinosaur Face
Facial details are where an amigurumi character truly comes alive. The featured style uses large black eyes, tiny nostrils, a small mouth, and pink cheeks. Together, these details create a friendly expression that works especially well with the rounded proportions of the dinosaur.
Safety eyes can be installed before the head is completely closed, allowing you to secure them from inside the crocheted fabric. If the finished item is intended for a young child, always consider age-appropriate construction and follow the safety guidance provided with the materials you use.
Embroidered facial details are another way to customize the design. A simple change in the mouth shape can create a different personality, while small pink circles or embroidered accents can give the cheeks a soft, rosy appearance.
How to Assemble a Crochet Dinosaur
Assembly is one of the most important stages because even well-crocheted pieces can look uneven if they are attached without checking their placement. The illustrated construction shows a straightforward sequence that starts with the main body and head before moving on to the limbs and tail.
- Complete and lightly stuff the head and body.
- Position the head carefully on top of the body and sew it securely.
- Attach the arms symmetrically to the sides of the body.
- Position the legs toward the front bottom of the body.
- Sew the tail securely to the back, checking that it follows the intended angle.
- Attach the spikes along the head and back in an even sequence.
- Add the facial details and any optional decorative accents.
- Weave in remaining yarn ends and gently adjust the stuffing and shape.
Do not rush the sewing stage. Take a moment to compare both sides of the character before making each attachment permanent. Symmetry is especially noticeable in the eyes, arms, and legs, while the tail and spikes can have a little more freedom depending on the look you want.
Ways to Personalize Your Cute Amigurumi
One of the best things about crochet amigurumi is how easily a basic pattern can become your own. The dinosaur shape can remain recognizable while the colors, facial expression, decorations, and proportions change.
- Use lavender, sky blue, peach, or sunny yellow instead of mint green.
- Make the belly a contrasting neutral or a brighter accent color.
- Experiment with different spike colors for a playful look.
- Add small crocheted flowers, bows, stars, or other simple embellishments.
- Change the eye placement slightly to create a different expression.
- Create several dinosaurs in different color combinations for a coordinated collection.
- Adjust the yarn weight and hook size to create a larger or smaller character, while keeping the proportions in mind.
Turning the Project Into a Handmade Gift
A finished amigurumi dinosaur can make a thoughtful handmade gift because it feels personal and carefully crafted. The soft colors and friendly expression make this style suitable for nursery-inspired decor, craft collections, themed gifts, or simply a cheerful addition to a handmade toy shelf.
You can also create a small collection by making several dinosaurs with different colors and personalities. One might have a pastel pink belly, another could feature blue spikes, and another could use a neutral earth-tone palette. The same basic concept can produce a surprisingly varied group of characters.
Tips for a Cleaner Finished Project
Neat finishing is what separates a rushed amigurumi project from one that looks polished. Keep your stitch tension as consistent as possible, count rounds carefully, and use a stitch marker when working continuously. When sewing pieces together, use small, secure stitches and hide the yarn ends inside the project whenever possible.
It is also worth checking the shape frequently during construction. If the head is slightly tilted, an arm is positioned too high, or the legs are uneven, correcting the placement before sewing everything permanently can save significant time.
At a Glance
- Style: Soft, playful crochet dinosaur amigurumi
- Main palette: Mint green, cream, darker green, pink, and black
- Key techniques: Continuous rounds, increases, decreases, stuffing, and sewing
- Standout details: Large eyes, rosy cheeks, textured spikes, and a tapered tail
- Personalization: Experiment with colors, expressions, decorations, and yarn textures
Conclusion: Make Your Own Cute Amigurumi Dinosaur
Cute amigurumi is a wonderful combination of creativity, patience, and simple crochet techniques. A playful dinosaur brings all of those qualities together in one approachable project. Its rounded head, soft body, tiny limbs, textured spikes, and expressive face create a character that looks complicated at first glance but is built from familiar crochet components.
The real charm comes from the freedom to make the design your own. Start with a soft pastel palette for a gentle look, choose bold colors for something more energetic, or create a whole family of dinosaurs with different personalities. Pay attention to stuffing, symmetry, and assembly, then finish the character with carefully placed facial details.
Whether you are learning amigurumi for the first time or adding another handmade character to your collection, a cute crochet dinosaur is a rewarding project to keep on your craft list. Gather your yarn, prepare your hook, and let the small stitches build something wonderfully cuddly.