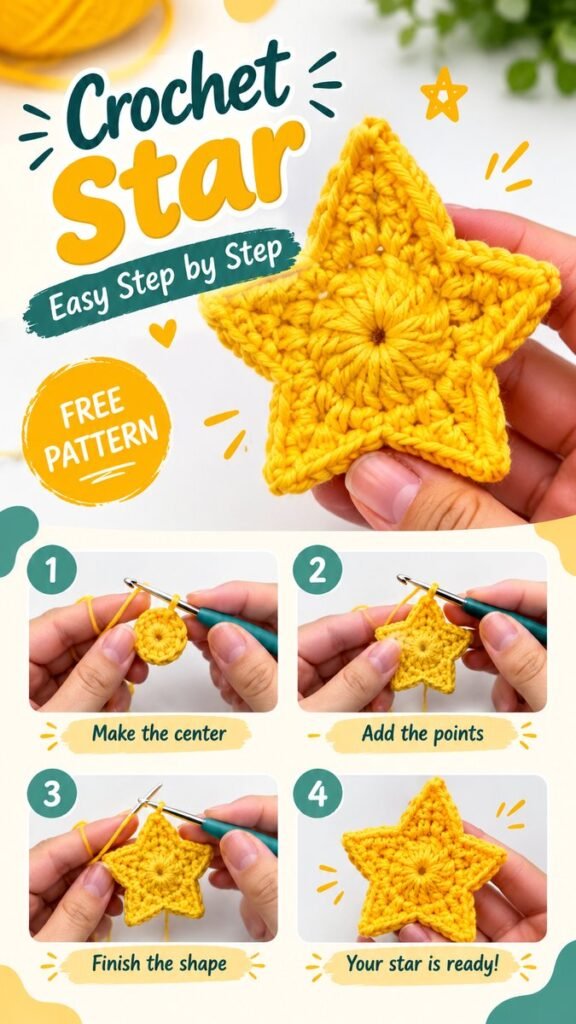
Looking for a small crochet project that is quick, cheerful, and endlessly useful? A crochet star is a wonderful choice for beginners and experienced crafters alike. With a simple five-point shape, bright yarn, and a few basic crochet techniques, you can create a charming handmade star for decorations, gifts, garlands, ornaments, accessories, and countless creative projects.
Important: The beauty of a crochet star is its versatility. Once you understand how the center develops and how the points are shaped, you can experiment with different yarn weights, colors, sizes, and finishing ideas to make each star uniquely yours.
Key Takeaways
- A crochet star is a quick and beginner-friendly handmade project.
- A small star can be used for ornaments, garlands, gifts, and appliqués.
- Bright yarn makes the star shape especially eye-catching.
- The basic design can be customized with different colors and yarn weights.
- Simple finishing details can turn one crochet star into a complete decorative project.
Why Crochet Stars Are So Fun to Make
Small crochet projects have a special appeal because they provide a satisfying result without requiring a large time commitment. A crochet star is a perfect example. The finished shape is instantly recognizable, while the construction offers useful practice with shaping, working into stitches, and maintaining even tension.
The bright yellow star shown in this style of project has a cheerful, playful appearance. Its compact size also makes it easy to imagine in many different craft applications. You could make several stars in coordinating colors and arrange them into a garland, attach one to a wrapped gift, or use them as decorative accents on handmade items.
Another advantage is that stars are easy to personalize. A soft pastel palette can create a delicate look, while bold shades produce a more energetic design. Metallic or textured yarn can add another layer of interest when you want a more decorative finish.
What You Need for a Simple Crochet Star
One of the reasons this project works well for beginners is that the supply list can remain very small. You do not need a large collection of materials to get started.
- Yarn: Choose a yarn that is comfortable to handle and gives the stitches good definition.
- Crochet hook: Select a hook that works comfortably with your chosen yarn.
- Yarn needle: Useful for weaving in the loose ends when the star is finished.
- Scissors: Keep a small pair nearby for clean finishing.
You can begin with a single color if you want to concentrate on learning the shape. Once you are comfortable with the construction, try combining colors or making a collection of stars in different shades.
Choosing Yarn for Your Star
For a small crochet star, yarn with clear stitch definition can make the shaping easier to see. Smooth yarn is particularly helpful when you are learning because individual stitches are easier to identify. A bright color can also make the points and center stand out beautifully.
If your goal is a delicate ornament, a finer yarn can produce a lightweight result. For a chunkier decorative star, a thicker yarn can create a bold texture and a larger finished shape. The important thing is to keep your hook and yarn compatible so the stitches are neither extremely tight nor excessively loose.
Understanding the Crochet Star Shape
At first glance, a five-point crochet star may look complicated. In reality, the design becomes much easier to understand when you think of it as a center surrounded by five repeating sections.
The center forms the foundation of the project. From there, the crochet work develops outward, creating the points that give the finished piece its characteristic star shape. The exact stitch combination can vary depending on the pattern, but the visual principle remains similar.
Pro Tip: Pay close attention to stitch placement while forming the points. Consistent tension and careful counting help keep all five points balanced and give the finished crochet star a neat, symmetrical appearance.
Start With the Center
The first stage is creating a small central foundation. This section may look simple, but it establishes the structure that everything else will build upon. Keep your stitches even and avoid pulling the yarn too tightly.
A relaxed grip can make a noticeable difference. If the center becomes too tight, it may be difficult to work additional stitches into it. If it becomes too loose, the finished star may lack definition. Finding a comfortable tension is more important than trying to crochet as quickly as possible.
Build the Five Points
Once the center is established, the next stage is shaping the five points. This is where the small crochet piece begins to look unmistakably like a star. Repeating the same shaping process around the center helps create an even five-point silhouette.
Work slowly during this part, especially if you are new to crochet. It can be useful to pause after each section and check that the emerging shape looks balanced. If one point seems noticeably different, checking the stitch count before continuing can save time later.
Finish and Shape the Star
After the final point is completed, take a moment to look at the outline. Gently arrange the points so they sit evenly. Depending on the yarn and tension, the star may naturally hold its shape, or it may benefit from gentle adjustment by hand.
Finally, secure and weave in the yarn ends neatly. A clean finish is especially important when the star will be used as a visible decoration or attached to another handmade item.
Expert Insight
- Count each section carefully when creating the five points.
- Keep your tension consistent so the points remain similar in size.
- Shape the finished star gently rather than pulling aggressively on the stitches.
Creative Ways to Use Crochet Stars
Once you have made your first crochet star, it is easy to find new ways to use the design. Small handmade pieces are particularly valuable because they can be incorporated into projects you already enjoy.
Crochet Star Ornaments
Add a small loop to the top of a finished star and turn it into a simple hanging ornament. Make several in different colors for a coordinated collection. They can also be used as seasonal decorations or added to a handmade display.
Gift Decorations
A crochet star can make ordinary gift wrapping feel more personal. Attach one to ribbon, twine, or a gift tag for a reusable handmade accent. The recipient can then keep the star and use it as a decoration later.
Garlands and Bunting
Make multiple stars and connect them with yarn or another suitable cord to create a cheerful garland. Mixing sizes can add visual movement, while using one color family can create a coordinated handmade look.
Appliqués and Accessories
Flat crochet stars can also become decorative appliqués. Depending on the finished size, they can be attached to bags, clothing, blankets, hats, cushions, or other craft projects. Always make sure the star is securely attached when it will be handled frequently.
Tips for a Neat and Even Crochet Star
A beautiful crochet star does not require complicated techniques. The biggest difference usually comes from careful stitch placement and consistent tension.
- Count your stitches. Small projects can change shape quickly when a stitch is accidentally skipped or added.
- Keep your tension steady. Try to maintain the same yarn tension throughout each section.
- Check each point. Compare the points as you work instead of waiting until the very end.
- Use clear yarn. Smooth yarn makes stitch definition easier to see while learning.
- Finish carefully. Secure loose ends and gently arrange the points for a polished result.
Quick Note: Do not worry if your first crochet star is not perfectly symmetrical. Small handmade projects often improve quickly with practice. Focus on understanding the construction first, then refine your tension and shaping with each new star.
How to Make the Project Your Own
Once you are comfortable with the basic crochet star structure, experimentation becomes one of the most enjoyable parts. Try making tiny stars for embellishments or larger versions for decorative displays. You can also explore different color combinations to match a room, event, gift, or existing crochet project.
For a playful collection, combine bright colors and alternate them throughout a garland. For a softer handmade aesthetic, use neutral, pastel, or earthy shades. Textured yarn can add visual interest, while a smooth yarn keeps the stitch pattern crisp and easy to see.
You can also experiment with arrangement. A single star makes a simple accent, while several stars together can become a much more noticeable decorative feature. The same basic crochet idea can therefore support many different craft projects.
Why This Is a Great Beginner Crochet Project
A crochet star offers a useful introduction to shaping without requiring a large finished project. Beginners can practice working in a small area, following a repeated structure, controlling tension, and finishing loose ends. Because the result develops quickly, it is also an encouraging project for anyone who wants to see progress in a single sitting.
For more experienced crocheters, the same design can be used as a quick creative project between larger pieces. It is also an excellent way to use small amounts of leftover yarn, especially when you want to create several coordinating decorations.
At a Glance
- Simple five-point crochet shape
- Ideal for beginners and quick projects
- Easy to customize with colors and yarn sizes
- Useful for ornaments, garlands, gifts, and appliqués
- Perfect for using small yarn leftovers
Conclusion
A crochet star is a simple project with plenty of creative potential. Its recognizable shape, compact size, and customizable design make it a fun choice for beginners while still offering experienced crocheters plenty of room to experiment. Start with one color and focus on creating an even center and five balanced points. Once you are comfortable with the basic construction, try different yarns, color combinations, sizes, and decorative uses.
Whether you turn your finished stars into ornaments, gift accents, garlands, appliqués, or small handmade decorations, this project is a lovely way to transform a little yarn into something cheerful and useful. Keep a few favorite colors nearby, practice your tension, and enjoy making one star at a time.
Tags
Crochet Star Crochet Pattern Easy Crochet Beginner Crochet Crochet Projects Crochet Ornaments DIY Crochet Handmade Crafts